
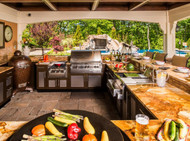
10 Outdoor Kitchen Layout Mistakes to Avoid (and How to Fix Them)
Posted by The BBQ Authority Team on Nov 16th 2026
The most common outdoor kitchen layout mistakes are leaving too little counter space beside the grill, ignoring wind and smoke, forgetting to plan gas, power and water before construction, skipping island ventilation, and building the island before choosing the grill. Most of these are easy to avoid on paper and expensive to fix once the concrete is poured and the countertops are cut.
The new outdoor kitchen looks incredible: stone veneer, granite counters, a gleaming built-in grill. Then the first real cookout happens. There's nowhere to set down the platter of raw steaks. Smoke drifts straight into the dining area every time the wind picks up. The fridge is so close to the grill that the drinks are lukewarm by 3 p.m. And the only trash can is inside the house.
None of those problems are about the grill. They're outdoor kitchen design problems, and each one is simple to plan around before anything gets built.
Start With Zones, Not Appliances
Before you look at grills, think about how you'll actually move around while cooking. Indoor kitchen designers use zones, and the idea works just as well outside.
| Zone | What goes there | Layout tip |
|---|---|---|
| Hot zone | Grill, side burner, pizza oven | Give it the most counter space and the best ventilation |
| Cold zone | Refrigerator, ice maker, kegerator | Keep it away from the grill's heat and out of direct sun |
| Wet zone | Sink and bar center | Place it between prep and cooking if you can run water |
| Dry zone | Prep counter, storage drawers, trash | Put it right next to the hot zone for easy landing space |
| Social zone | Bar seating, dining table | Keep guests close enough to talk, but out of the cook's path and the smoke |
With those zones in mind, here are the ten outdoor kitchen mistakes we see most often.
1. Leaving Too Little Counter Space Beside the Grill
This is the number one regret we hear. You need room to set down raw meat, a platter for finished food, tongs, sauces and a drink. If the grill sits between two narrow strips of counter, every cook turns into a balancing act.
Plan generous landing space on at least one side of the grill, and ideally both. A common rule of thumb is at least 12 to 18 inches on each side, with more on your main prep side. If space is tight, a longer island with a single built-in grill usually works better than squeezing in extra appliances.
2. Ignoring Wind and Smoke Direction
Spend a few evenings watching where the breeze usually comes from. If the grill sits upwind of your seating or your back door, smoke will follow guests all night and drift into the house.
Ideally, place the grill so prevailing winds carry smoke away from the dining area, doors and windows. If your space doesn't allow that, a covered kitchen with an outdoor-rated vent hood can help pull smoke up and out.
3. Putting the Grill Too Close to the House or Under a Low Roof
Built-in grills put out serious heat. Every grill has required clearances to combustible materials like siding, wood beams and pergolas, listed in its installation manual. Ignoring them is a fire risk and can void the warranty.
If you want the grill under a roof or pergola, check the clearance requirements and whether a vent hood is required or recommended. In many covered layouts, a hood isn't optional.
4. Forgetting to Plan Utilities Before Construction
Gas lines, electrical, water supply and drainage are far cheaper to run before the slab is poured and the island is built. After that, adding them can mean cutting concrete or tearing out stone.
Before construction, decide:
- Gas: Natural gas or propane, where the line enters the island, and where the shutoff valve goes
- Electrical: Outlets, a rotisserie motor, refrigeration and lighting, all on GFCI-protected outdoor circuits
- Water: Whether you want a sink or ice maker that needs a supply line
- Drainage: Where sink and ice maker water will go
Have gas and electrical work done by licensed professionals, and check whether your town requires permits.
5. Skipping Island Ventilation and Insulation
Gas grills and side burners need ventilation in the island so leaked gas can't build up inside the enclosure. Many manufacturers also require an insulated jacket when a grill is installed in an island made of combustible materials like wood framing.
They're easy to overlook because they're hidden inside the island. Add vent panels and plan for insulated jackets before the island is finished.
6. Building the Island Before Choosing the Grill
Every built-in grill has its own cutout dimensions, and they vary by brand and model. Build the island first, and you may find the grill you want doesn't fit, or that you need a costly countertop modification.
Choose your built-in grill and major components first, get the exact cutout specs from the installation guides, and give them to your builder. A pre-designed island or island bundle removes this guesswork entirely. If this is your first built-in grill, our guide to the best built-in gas grills for first-time buyers can help you narrow it down.
7. Not Planning Enough Storage (or Anywhere for Trash)
Without storage, every cookout starts with trips inside for tongs, foil, plates, charcoal and cleaning supplies. Without a trash spot, the paper plates pile up on the counter.
Plan access doors, drawers or door and drawer combos near the grill for tools and supplies. A pull-out trash and recycling bin built into the island is one of the most appreciated features in any outdoor kitchen. Many grills also need an access door beneath them so you can reach the gas connection and propane tank.
8. Putting the Refrigerator Right Next to the Grill
A fridge pressed against the grill fights its heat all afternoon, and direct sun makes it worse.
Separate the cold zone from the hot zone with a stretch of counter or a storage cabinet, and put refrigeration in the shadiest part of the island. Always choose outdoor-rated, front-venting units for built-in installations.
9. Forgetting Shade and Lighting
That west-facing island might look great in the morning, but at 5 p.m. in July the cook is squinting into the sun on a scorching patio. And once the sun goes down, it's hard to tell whether the chicken is done.
Plan some shade over the cooking area, whether that's a pergola, roof, awning or well-placed umbrella. For evening cooks, add task lighting over the counters and grill lights for the cooking surface.
10. Blocking Traffic Flow
The cook needs a clear path between the fridge, prep counter and grill. Guests need a way to grab a drink without walking through the cooking area.
Leave at least a few feet of open space behind the cook, keep the grill out of main walking paths, and consider a raised bar ledge on the guest side of the island. An L-shape or U-shape layout often works well, keeping the cook in a protected work area while still facing guests.
How to Get Your Outdoor Kitchen Layout Right
Good outdoor kitchen planning follows a simple order: measure your space, note the sun and wind, choose your grill and components, then design the island around them. Our Outdoor Kitchen Planning: Components & Costs guide walks through budgeting and component choices step by step, and Best Premium Gas Grills for Backyard Kitchens can help you pick the centerpiece.
BBQ Authority offers built-in grill packages and outdoor kitchen components for custom backyard designs, so your grill, island, storage and refrigeration all fit together from the start.
Top Picks for a Well-Planned Outdoor Kitchen
Pre-designed islands paired with matching components to take the guesswork out of layout.
The centerpiece of any outdoor kitchen. Choose this first so your island fits it perfectly.
Access doors, drawers and combos to keep tools, supplies and trash close at hand.
4. Bars & Sinks
Add a wet zone for prep and cleanup, and keep guests out of the cook's way.
Frequently Asked Questions
What are the most common outdoor kitchen mistakes?
Too little counter space next to the grill, poor grill placement for wind and smoke, and forgetting to plan gas, power and water before construction.
How much counter space do you need next to a built-in grill?
A common guideline is at least 12 to 18 inches on each side, with more on your main prep side. More space is almost always better.
Should I buy the grill before building the island?
Yes. Built-in grills have specific cutout dimensions, so choose your grill and components first and design the island around them.
Does an outdoor kitchen island need ventilation?
Islands with gas appliances usually need vent panels so gas can't build up inside. Check each appliance's installation manual for requirements.
Where should the refrigerator go in an outdoor kitchen?
Away from the grill's heat and, ideally, in the shade. Separate it from the grill with counter space or storage.
Plan It Once, Enjoy It for Years
A great outdoor kitchen layout should feel effortless: plenty of space to work, cold drinks within reach, smoke drifting away from guests and everything you need right where you need it. BBQ Authority offers expert customer service to help you plan your layout and choose components, with live chat, phone and email support. Shop islands, built-in grills and outdoor kitchen components at bbq-authority.com or call 866-238-9228, and build the backyard kitchen you'll still love ten summers from now.