
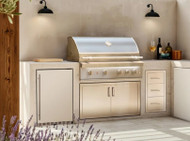
Outdoor Kitchen Planning: Components & Costs
Jul 22nd 2026
An outdoor kitchen is one of the best additions you can make to a backyard, but it's also one of the easiest to under-plan. Before you pick a grill or pour a slab, it helps to understand what components you actually need, what elements are optional, and what realistic cost ranges look like. This guide walks through the planning process end to end.
Planning Your Layout
The most common outdoor kitchen mistake is buying appliances before deciding on a layout. Work backward instead. Sketch your layout, even roughly, before you shop for any components.
- Plan the flow between prep, cooking, and storage: Just like an indoor kitchen, you’ll want short, logical distances between where food is prepared, cooked, and stored.
- Decide on a footprint shape: Straight-line runs are the cheapest to build and easiest to plan. L-shapes and U-shapes add prep space and seating but cost more in structure and countertop material. If you're working with a tight patio or balcony, a compact straight-line run paired with a smaller-footprint grill is usually the better trade than squeezing an L-shape into the space.
- Account for traffic: Leave at least 36 to 42 inches of clearance behind anyone standing at the grill so foot traffic and other guests don't create a bottleneck.
- Plan utilities early: Gas lines, electrical runs, and water and drain lines are much cheaper to install before structure and countertops go in.
Must-Have vs. Nice-to-Have Components
Must-Haves
These elements are the core of nearly every outdoor kitchen:
- The Grill: This is the anchor of the layout and usually the first purchase. A built-in gas grill is the most common choice because it integrates cleanly into cabinetry and delivers consistent, high-heat performance.
- Structure and Frame: The masonry, block, or framed structure that houses your appliances and supports the countertop.
- Countertops: Prep space around the grill is non-negotiable, and even a modest kitchen needs 24 to 36 inches of usable counter.
- Ventilation: If the grill is under any kind of roof, pergola, or enclosure, proper ventilation is a safety requirement.
Nice-to-Haves
These components improve functionality and resale value, but can be added later:
- Side Burners: Extra stovetop-style burners for sauces, sides, or anything that needs a pan instead of a grate.
- Refrigeration: An outdoor fridge or beverage drawers to cut down on trips inside.
- A Sink: Useful for preparation and cleanup, but requires plumbing and drainage.
- Extra Storage: Drawers, doors, and cabinets for tools, fuel, and serveware.
Material Choices
Outdoor kitchens live outside year-round, so the materials selected affect both cost and lifespan:
- Structure: Concrete block (CMU) is the most affordable and durable base, while steel-stud frame systems are lighter and faster to install but need weatherproofing.
- Countertops: Granite and porcelain slab are the most popular for durability and heat resistance. Concrete offers a custom look at a mid-range price. Natural stone tile is budget-friendly but has more grout maintenance.
- Cabinetry: Stainless steel resists rust and UV damage far better than wood composites in humid or coastal climates.
- Grill Housing: Look for insulated liners rated for your specific grill model. This protects surrounding cabinetry from heat damage and is often required to keep warranties valid.
Ventilation and Clearances
Ventilation is one of the most overlooked planning items, and one of the most important. If your grill sits under a roof, pergola, or any overhead structure, you need a vent hood or a properly sized vent path to exhaust heat and combustion byproducts. Manufacturers specify minimum clearances from the grill to combustible materials, typically measured in inches on each side and above. These vary by model, so check the spec sheet before finalizing your structure's dimensions.
Islands should also have vent openings at the base to prevent gas buildup, which is particularly important for enclosed cabinets housing a gas line. If you're building against a wall or under a covered patio attached to the house, local code will often require additional fire-rated clearance or venting, so check with your building department before construction.
Budgeting and Cost Ranges
Costs vary widely by region, material, and how much you DIY. For context on what homeowners are actually spending, see our breakdown of outdoor kitchen investment trends. Use the tiers below as a general framework:
| Tier | What's Included | What to Expect |
|---|---|---|
| Basic | Simple straight-line island, built-in grill, laminate or tile countertop, and minimal storage. | Lower end of the market with a compact, grill-focused setup costing a few thousand dollars. |
| Mid-Range | L-shaped layout, stone or porcelain countertops, side burner, storage, and basic ventilation. | The range most homeowners choose, balancing durable materials and added functionality on a moderate budget. |
| Premium | Full U-shaped layout, premium grill, refrigeration, sink, custom stonework, and integrated ventilation. | Top of the market with premium appliances and fully customized masonry construction. |
A good rule of thumb is that the grill itself is often only 20 to 35 percent of total project cost. Structure, countertops, utilities, and labor typically make up the majority of the budget, which is why layout planning matters more than appliance shopping in the early stages. That said, the appliance tier you choose still moves the number, and the gap between premium and budget grills is where most of the variance sits.
DIY vs. Professional Install
Certain parts of an outdoor kitchen build can be done yourself, while others are better left to professionals, and some can take a hybrid approach. Deciding what to build yourself and what to hand off usually comes down to skill, permits, and how much your time is worth.
- DIY-Friendly: Assembling a modular or prefab island kit, installing a freestanding grill cart, or doing cosmetic finishing work like tile or paint.
- For Professionals: Gas line installation and connection, electrical runs, plumbing and drainage for a sink, structural masonry, and anything requiring a permit in your area.
- Hybrid Approach: Many homeowners have a contractor handle utilities and structure, then finish counters, cabinetry, or decor themselves to save on labor costs.
Always check local permitting requirements before installing gas or electrical. Even in a backyard, most jurisdictions require inspection for gas line work.
Ready to Choose Your Grill?
Once your layout and budget are set, the grill is usually the first purchase. Browse the full Built-In Gas Grills collection at BBQ Authority to compare models by size, material, and price, or start with our ranked breakdown of BTU output and cooking area across the Napoleon lineup.
Frequently Asked Questions
How much does an outdoor kitchen cost?
Costs range from a few thousand dollars for a basic grill island to over five figures for a full custom build with premium appliances, stone counters, and plumbing. The highest costs are structure and masonry, countertop material, and utility work (gas, electric, water), not just the grill itself. Our outdoor kitchen investment data breaks down what homeowners spent by project scope.
What components do I need to build an outdoor kitchen?
At minimum, an outdoor kitchen needs a grill, a structural base or island, enough counter space, and proper ventilation if it's under any kind of roof. Everything else is optional and can be added in later phases, including side burners, a sink, refrigeration, and extra storage.
Is ventilation required for building an outdoor kitchen?
Yes, ventilation is required if the grill will be under a pergola, roof, or any overhead structure. Even open-air islands benefit from vent openings at the cabinet base to prevent gas buildup. Manufacturer clearance specs and local building codes both typically address ventilation requirements, so check both before finalizing your design.